In the demanding environment of scientific research and quality control, the integrity of a sample or component is paramount. Traditional, destructive testing methods, while invaluable for determining ultimate strength or failure points, render the subject unusable for subsequent analysis or application. This limitation has driven the evolution and widespread adoption of non-destructive testing (NDT) methods. Non-destructive testing provides a powerful suite of analytical tools that allow for the examination of materials, components, and systems for discontinuities or differences in characteristics without causing damage to the part being inspected. The ability to assess a material's state, pinpoint defects, and monitor structural changes over time without sample destruction is critical for everything from failure analysis to ensuring the safety of critical infrastructure.
For laboratory professionals, understanding the principles, applications, and limitations of various non-destructive testing techniques is essential for a broad range of disciplines, including materials science, civil engineering, aerospace, and manufacturing. These techniques are not merely about defect detection; they are a fundamental part of quality assurance, predictive maintenance, and the characterization of material properties. This article will provide a detailed overview of key non-destructive testing methods, illuminating their underlying principles and practical applications for enhancing safety, reliability, and efficiency in laboratory operations.
What are Non-Destructive Testing Methods?
Non-destructive testing (NDT) methods encompass a variety of techniques for examining an object, material, or component without causing any physical damage. The core purpose of NDT is to detect, locate, and measure discontinuities, flaws, or other characteristics that might compromise the integrity or safety of the subject. Unlike destructive methods that require testing to the point of failure, NDT allows the part to be used after inspection, making it an invaluable tool for quality control, research, and maintenance.
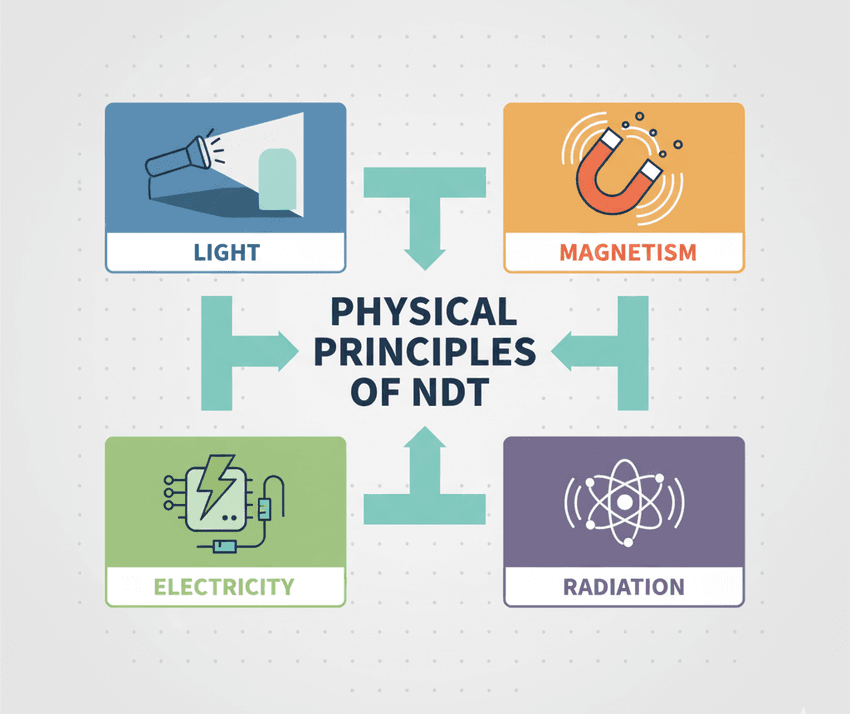
The key physical principles at the heart of NDT.
GEMINI (2025)
A fundamental aspect of NDT is that it relies on different forms of energy or physical principles to interrogate a material. These principles can include sound waves, light, magnetism, electricity, and radiation. The interaction of this energy with the material's properties—or with the presence of a flaw—provides a measurable signal that can be analyzed to determine the internal and external condition of the subject. NDT is a broad field with applications across virtually every industry, from inspecting welds in pipelines to detecting micro-cracks in aerospace components. For the laboratory, this means the preservation of valuable or rare samples, and the ability to conduct repeated tests on a single specimen to track changes over time, a capability not possible with destructive methods.
The Principles of Visual and Liquid Penetrant Non-Destructive Testing
Visual inspection is the most basic and widely used non-destructive testing method. It involves the use of the naked eye, often enhanced with tools such as magnifying glasses, boroscopes, or cameras, to detect surface flaws. This method is the first line of defense in quality control and is crucial for identifying surface discontinuities like cracks, corrosion, or misalignments. While seemingly simple, a thorough visual inspection requires trained professionals who understand the material, its common failure modes, and what constitutes a defect. It is the foundation upon which more complex non-destructive testing techniques are often built.
Liquid penetrant testing (LPT), also known as dye penetrant inspection, is a more advanced non-destructive testing technique used to detect surface-breaking discontinuities in non-porous materials. The method relies on capillary action to draw a liquid penetrant into a surface crack. The process involves several key steps to reveal otherwise invisible flaws.
- Surface Preparation: The surface must be thoroughly cleaned to remove all contaminants, such as dirt, grease, and rust, that could block the penetrant from entering a discontinuity.
- Penetrant Application: A visible or fluorescent dye is applied to the surface. It is allowed to dwell for a specific period, giving it time to seep into any surface-breaking flaws.
- Excess Penetrant Removal: The excess penetrant is carefully removed from the surface, leaving only the penetrant trapped within the discontinuities.
- Developer Application: A thin layer of developer is applied. The developer acts like a blotter, drawing the penetrant out of the discontinuity and spreading it on the surface.
- Inspection and Evaluation: The part is inspected under appropriate lighting conditions. For fluorescent penetrants, a UV light is used, causing the trapped penetrant to glow brightly and highlight the defect. Visible penetrants are inspected under normal light, where the penetrant bleeding out onto the developer creates a vivid indication of the flaw.
Liquid penetrant testing is highly effective for detecting a wide range of surface discontinuities and is a cost-effective method. It is limited, however, to flaws that are open to the surface and cannot detect subsurface defects.
Advanced Non-Destructive Testing: Ultrasonic and Radiographic Techniques
Ultrasonic non-destructive testing (UT) is a powerful method used to detect internal flaws and characterize materials. The principle is based on the transmission of high-frequency sound waves, typically above the range of human hearing, into a material. A transducer generates these waves, which travel through the material until they encounter a boundary, such as an internal crack or the opposite surface. At this boundary, a portion of the sound energy is reflected back to the transducer. The time it takes for the echo to return is measured and used to determine the location and size of the flaw.
Ultrasonic testing can be used to detect a variety of internal flaws, including voids, laminations, and inclusions. It is also employed for thickness measurement, which is crucial for monitoring corrosion in pipelines or tanks. The primary advantage of UT is its ability to find subsurface defects, but its effectiveness depends heavily on the skill of the operator and the material's properties. For example, highly attenuative materials like concrete or coarse-grained materials can make a reliable inspection difficult.
Radiographic non-destructive testing (RT) uses penetrating radiation, such as X-rays or gamma rays, to create an image of a material's internal structure. The principle is similar to a medical X-ray. The radiation source is placed on one side of the test object, and a film or digital detector is placed on the opposite side. The radiation passes through the material and is attenuated (absorbed or scattered) at different rates depending on the material's thickness and density. Less dense areas, such as voids or cracks, allow more radiation to pass through, creating a darker image on the film. Conversely, denser areas appear lighter.
Radiographic testing is highly effective for detecting internal voids, porosity, and inclusions. It provides a permanent record of the inspection, which can be stored and reviewed later. However, RT requires strict safety protocols due to the use of ionizing radiation and can be a slow process depending on the material thickness and radiation source. This non-destructive testing method is widely used in the aerospace, power generation, and welding industries for its unparalleled ability to provide a clear view of a component’s internal structure.
Specialized Non-Destructive Testing: Eddy Current and Magnetic Particle Methods
Eddy current testing (ECT) is a non-destructive testing method based on the principles of electromagnetic induction. An alternating current is passed through a coil, creating a fluctuating magnetic field. When this coil is brought near a conductive material, the magnetic field induces circular electrical currents, known as eddy currents, within the material. The presence of a flaw, such as a surface crack or a change in material thickness, disrupts the flow of these eddy currents. This disruption causes a change in the impedance of the coil, which can be measured and interpreted to identify the flaw's presence and location.
ECT is a highly sensitive non-destructive testing technique that excels at detecting small surface and near-surface cracks, particularly in conductive materials like metals. It is widely used in aerospace for inspecting aircraft skins and in manufacturing for sorting materials and detecting heat damage. A key advantage of ECT is that it does not require direct contact with the test surface, but it is limited to conductive materials and is not suitable for detecting flaws deep within the material.
Magnetic particle non-destructive testing (MPT) is used to detect surface and near-surface flaws in ferromagnetic materials, such as iron, cobalt, and nickel. The method involves magnetizing the part, either by passing an electric current through it or by placing it in an external magnetic field. When a magnetic field is applied to a material with a surface-breaking flaw, the magnetic field lines are disrupted and "leak" out of the material at the location of the flaw, creating a localized magnetic pole. Fine ferromagnetic particles, either dry or suspended in a liquid, are then applied to the surface. These particles are attracted to the leakage field, accumulating at the flaw and creating a visible indication.
MPT is a relatively simple and highly effective non-destructive testing method for detecting surface and slightly subsurface flaws in ferromagnetic materials. It is a cost-effective technique widely used in automotive, aerospace, and structural steel industries. However, MPT can only be used on materials that can be magnetized, and it is not suitable for detecting flaws deep within the material or in non-ferromagnetic alloys like aluminum or titanium.
Future-Proofing Laboratories with Non-Destructive Testing
The landscape of non-destructive testing is continuously evolving, with new technologies offering enhanced capabilities for material characterization and defect detection. Emerging methods like acoustic emission testing (AET), which listens for the faint sounds of a material under stress, and infrared thermography, which detects defects by observing thermal patterns, are expanding the possibilities. The integration of advanced data analytics, robotics, and artificial intelligence with traditional non-destructive testing techniques promises to revolutionize the field, enabling automated inspections, predictive maintenance, and more accurate defect sizing.
For laboratory professionals, a mastery of non-destructive testing is no longer a niche skill but a fundamental requirement for maintaining the highest standards of quality and safety. By adopting these methods, laboratories can preserve valuable samples, track material degradation over time, and ensure that components meet rigorous safety and performance criteria without the need for destructive sacrifice. The strategic application of these non-destructive testing methods allows for a deeper understanding of material behavior, ultimately leading to more reliable research, safer products, and more efficient processes.
Frequently Asked Questions about Non-Destructive Testing
What are the primary benefits of non-destructive testing?
The main benefits of non-destructive testing include the preservation of the test object, cost-effectiveness through defect detection before major failure, enhanced safety by ensuring the integrity of critical components, and the ability to track changes over a material's lifespan.
How does ultrasonic non-destructive testing work?
Ultrasonic non-destructive testing functions by sending high-frequency sound waves through a material. It measures the echoes that return from internal boundaries or flaws, allowing for the precise location and sizing of internal discontinuities without damaging the part.
Is non-destructive testing suitable for all materials?
No, the suitability of a specific non-destructive testing method is dependent on the material's properties. For example, magnetic particle testing is limited to ferromagnetic materials, while eddy current testing is used exclusively on conductive materials. Visual and ultrasonic non-destructive testing have broader applicability across various materials.
What is the difference between destructive and non-destructive testing?
Destructive testing involves damaging or destroying the test object to determine its mechanical properties or ultimate failure point. In contrast, non-destructive testing evaluates a material or component for flaws and characteristics without causing any physical damage, allowing the object to remain in service.

